How to create a secure directory on a Mac
Data and information these days seem to be more valuable than gold or precious stones. With the ever increase of activity in computer crime and Internet fraud, users want to secure their personal data on their computers more now than ever before.
Although MacOS X is an extremely secure operating system from hackers when you are using the Internet, the physical computer itself is not that secure. Files can be easily transferred off your Mac if someone has direct access to your machine as they can reset your password with a system disk and also if they have another Mac computer and a Firewire cable.
So, how do you secure your files? How can you secure your files so that only you can access them? Fear not. MacOS X gives you the tools or tool in this tutorial, to do this “right out of the box” as Steve Jobs often says. In this tutorial, I will show you how to create a secure directory, so that you can place your important files and other related documents securely away.
You can instead, if you wish, encrypt your entire home directory using FileVault; this function is located in the Security System Preference.
Process
1. The tool that we are going to use, to create a secure directory, is called Disk Utility. It is located in the Applications > Utilities folder. We don’t actually create a secure directory as per sa, but more a ‘virtual’ directory. In fact, we create an encrypted disk image volume where we can save the files and documents we want to secure away. It’s the same principle as FileVault, but you have more control.
2. Launch the Disk Utility application if you haven’t done so already. We use this application to create a new disk volume image. Click on ‘New Image’ in the toolbar.
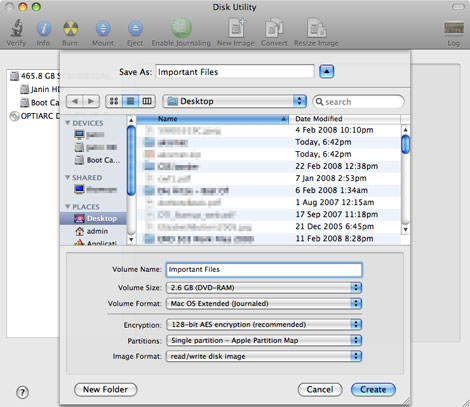
3. You will be presented with the usual ‘Save As’ dialogue box, but with a few added options. Save the disk image something like “Important Files” and select where you would like to save the image.
4. There are various options to choose from. The first one, Volume Name, is what you would like the volume to be called when you mount the disk image, name this whatever you like. Volume Size is the size of the image that you would like to create. For added security, you can save the image on a memory stick later and keep it in a safe place. Select a size that suits your needs. If you run out of room in the image, you will have to create a larger image at a later date. Volume Format you should leave as Mac OS Extended (Journaled) unless there is a specific reason why you should choose another.
5. The next option is Encryption. As stated in the application, you can choose 256-Bit encryption if you wish, but it will be slower. Pick the one that suits you best.
6. In The last two options, Partitions should read ‘Single partition – Apple Partition Map’ and Image Format should read ‘read/write disk image’. This makes you able to read and write files to the image file. You should have a dialogue box similar to the one below in the image:
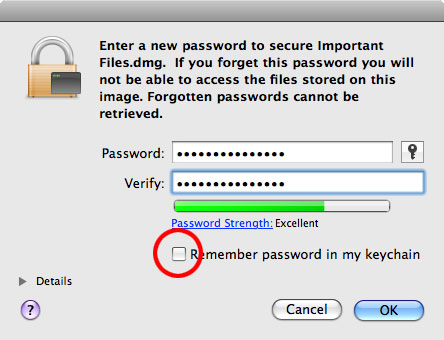
7. When you are happy with your settings, click Create. Because we choose to encrypt the image, Disk Utility will ask you for a password. Insert a password that is going to be strong as displayed by the password strength indicator.
DO NOT FORGET YOUR PASSWORD!!! If you forget your password, tuff. There is no way of retrieving the data; it’s gone, it’s lost, it’s gone the way of the bit, bye-bye, you’re SOL (shit out of luck). So choose a password carefully, but not stupidly, like your middle name etc.
Also, make sure that the check box for the ‘Remember password in my keychain’ is UNCHECKED (why this feature is here I’ll never know). We don’t want the password stored on your computer.
8. Once you clicked ‘OK’, the disk image will be saved to your computer to the location that you specified earlier and the virtual disk will mount on your Desktop ready for use. Then it’s just a simple process of copying the files that you want to secure away onto the virtual disk. Once you have copied the files over, you can delete the originals off your hard disk.
9. When you have finished, drag the virtual hard disk to the trash to ‘eject’ the disk, therefore unmounting the image.
10. When you want to use the virtual disk again, just double-click the image. It will ask you for the password for the image. Once successful, the virtual disk will then mount on your Desktop as before.
11. For added security, you could save the disk image onto a memory stick. Then you can store the memory stick somewhere that is not near your computer and only insert the memory stick when you want to access your files.

